Astro Image Processing with Lightroom and Photoshop
Written by Howard Gutgesell February 27, 2023 5:10 pmAstro image processing with Light Room and Photoshop
Download files into LR
Under Profile, click Remove Chromatic Aberration and Enable Profile Corrections
Increase image to 300% and use Manual sliders to reduce residual chromatic aberration
Use Noise reduction slider gently
Decrease Whites if stars over-exposed
Sync all images
Open images as layers in PS
Select all layers
Edit>Auto-align
Layers>Smart Objects>Convert to Smart Object
Layers>Smart Objects>Stack Mode>Median
Save the Stack (back into LR)
Re-open the Stack in PS
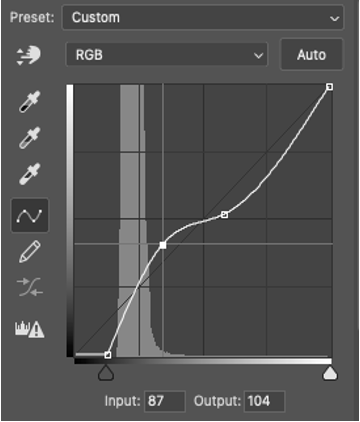
Use Curves tool to reduce light pollution and Stretch data (See photo)
Stretch the data, being careful to avoid over-exposing stars
Add saturation, vibrance, clarity, and texture to taste
(LR works well for this)
Introduction to Astrophotography
Written by Howard Gutgesell April 29, 2022 2:10 pmHoward Gutgesell
The development of digital cameras has made astrophotography possible for amateur photographers with relatively inexpensive equipment. There are several types of astrophotography:
Landscapes with the Milky Way (so-called Nightscapes)
Deep Sky imaging (nebulae, galaxies)
Planetary imaging
Aurora imaging
This article will cover Nightscape imaging, which is what I suggest as a starting point for those wishing to try astrophotography.
Equipment
Most modern DSLRs and mirrorless cameras are adequate. Either full-frame or crop-sensor cameras will work. They need to be capable of manual focusing, since Autofocus* will not work in the dark. Likewise, it is necessary to be able to set the ISO*, f-stop*, and exposure time manually. Examples of some of the less expensive models include:
Canon 6D, 7D, Rebel T7
Nikon D5600, D7200, D750
Sony a6400, a7S
Cell phone technology has been improving rapidly, and it is possible that some newer phones might be used for nightscapes, but there has been little experience with them to date. Point and Shoot cameras often don’t allow manual focusing and exposure settings.
The lens is actually more important than the camera. A fast, wide angle lens* is required, generally between 14 and 35mm focal length, f/2.8 or faster. Some examples:
Sigma 35 or 24 mm, f/1.4 or 14 mm f/1.8
Irix 15mm f/2.4
Rokinon 14 mm f/2.8
Tamron 35 mm f/1.4
Ironically, many of the third party lenses are better than comparable models from the name-brand companies. The less expensive models tend to be manual focus only, but this is not important because, as mentioned, Autofocus will not work in the dark. Fixed focal length lenses tend to work better than zoom lenses for astrophotography. Many DSLRs are sold with so-called kit lenses, typically with a fastest aperture of f/3.5. While the Milky Way can be imaged with these, it is often difficult to capture enough light without inducing star trailing (i.e., elongated stars or streaks).
Very wide angle lenses (14 or 15 mm) have a wide field of view, allowing an entire scene to be captured with a single exposure. Longer lenses (24-35 mm) capture more light and provide more detail, and multiple images can be stitched together to capture an entire scene.
A study tripod is necessary because exposures are typically 10-30 seconds in duration, even longer.
Tracking and Stacking
It turns out that the earth is spinning, but the stars are not. This means that with a long exposure, the star images will become elongated, even streaks. The degree to which this becomes apparent depends on the focal length of the lens. The longer the focal length, the shorter the exposure time before streaking occurs. A widely used formula for the longest useful exposure is the 500 Rule. It states that dividing 500 by the focal length of the lens gives the longest acceptable exposure. For example, for a 50 mm lens, 10 seconds would be the longest exposure. I find this too generous and use a 350 rule. At any exposure longer than 10 seconds with my 35 mm lens, the stars become egg-shaped. Exposures of 20-25 seconds are possible with very wide angle 14 mm lenses.
To compensate for the earth’s movement, many astrophotographers use a star tracker. These fit between the tripod and the camera and rotate the camera to keep the stars in focus as the earth spins, allowing much longer exposures. Examples include:
Move-Shoot-Move
iOptron Sky Tracker
Sky-Watcher Star Adventurer
Although the stars appear to be moving during a long exposure, the foreground does not. Therefore, when using a star tracker with long exposures, it is necessary to take a second exposure with the tracker turned off and combine the images with software.
Night photos tend to have a lot of digital noise*. One way to minimize this is by stacking multiple identical images, typically 5-10, with stacking software. For Mac users, there is Starry Landscape Stacker and for Windows, Sequator. The best nightscape images can be obtained by combining both tracking and stacking, but pleasing images can be obtained without using either of these techniques.
Camera Settings
Manual focus and exposure length
ISO 1600 or 3200
RAW, as opposed to jpeg, image quality
Daylight white balance (5300 Kelvin)*. Yes, this is counter-intuitive, but will preserve sky colors. Using “Auto” white balance will tend to produce images with nothing but blue sky and all white stars.
Lens aperture as wide as possible—ideally f/2.8 or wider.
There are several ways to achieve proper focus. One can use Autofocus during daylight, then tape the focal ring in place. I prefer to aim at a bright star, use Live View*, magnify the image, and turn the focus ring until the star is at its smallest and sharpest.
Finding the Milky Way
Although the Milky Way is visible all year round, the most interesting part, the galactic core, is only visible from late February to early November in the Northern Hemisphere. Thus, this is often called Milky Way Season. In Spring the Milky Way arises as an arc in the East during the early morning hours. By Summer, it appears more vertical, arising from the South after sunset, and by Fall it has moved more to the Southwest.
The best nightscapes have an interesting foreground (river, lake, mountains) with the Milky Way rising above it. It is best to scout potential sites during daylight, realizing that the Milky Way will be rising in the South. Be cognizant of rocks, water, cliffs, and even the potential of meeting wildlife.
You’ll also want to get out of town. The farther away from city light pollution, the more the Milky Way will stand out. Likewise, avoid moonlight. A new moon is best but a small amount of moonlight may enhance the image by lightening the foreground.
Resources
Processing Nightscapes is as important as photographing them, and the details are beyond the scope of this article. It requires the use of Photoshop or other image processing software. There are innumerable online tutorials on photographing the Milky Way and processing the images.
These are some websites and tutorials which I have found most helpful (and accurate):
Clarkvision.com
Contains over 25 articles on obtaining and processing night photographs by a professional astronomer, as well as an extensive gallery of night sky images.
Milky Way Nightscapes, by Royce Bair
An inexpensive e-book with detailed information for shooting and processing nightscape images.
How to Photograph Nightscapes and How to Process Nightscapes, by Alan Dyer
PDFs explaining equipment, camera settings, and image processing
*These are technical terms related to basic photography and camera settings.
Equipment for astrophotography
Written by Howard Gutgesell February 9, 2022 12:31 pmEntry level/Nightscapes:
- DSLR or mirrorless camera, ideally with at least a 16 megabyte sensor.
Nikon D7500 or D750, Canon 7D II or Rebel T7, Sony a6400 or a7S - Sturdy tripod
- Fairly fast wide-angle lens (f/2.8 or faster, 35mm or wider.)
Sigma 24 or 35mm f/1.4, 14mm f/1.8, Rokinon 14mm f/2.8, 24mm f/2.8 - Recommended but not essential to start
Intervalometer
Star tracker
iOptron SkyTracker Pro, Move-Shoot-Move, Sky-Watcher Star Adventurer
Intermediate- deep sky imaging:
- DSLR or mirrorless camera as above or more advanced
- Sturdy tripod
- Fast telephoto lens, f/5.6 or faster, prime lenses generally better
- Tracker essential
iOptron Sky Guider Pro, Sky-watcher Star Adventurer, Fornax Light II
Note: these are not GoTo trackers. Knowledge of the night sky is necessary to find targets
The next step:
- GoTo mount EQ mount
Sky-watcher EQM-35, EQ6-R, HEQ5, Celestron AVX - Telescope
William Optics Redcat 51 or Gran Turismo 71, Sky-watcher Evostar 80ED
Advanced—the sky is the limit:
- Dedicated cooled astro camera
- Large telescope
- High-end EQ mount
- Narrow-band filters
- Astro-specific software—Pixinsight, AstroPixelProcessor, Deep Sky Stacker
- Private observatory
Caveats: Although some try to take deep sky images without using a tracker (by taking up to 1000 1 or2 second exposures), I do not recommend this. Neither does my computer. Likewise, there is a growing interest in doing astrophotography with a cell-phone. It can be done, but the small sensors make achieving detailed, noise-free images challenging.
At the intermediate level of deep sky imaging, there are trade offs in terms of a prime telephoto lens vs a wide-field telescope. At a similar focal length, 250-400mm, prime telephoto lenses are more expensive than telescopes, but they can also be used for wildlife and sports photography.
The above examples are not meant to be all-inclusive. Many similar models from other brands are available.
Although there are many specialized software programs available, most experienced photographers are familiar with Lightroom and/or Photoshop. Deep sky images can be opened as Layers in PS, aligned, stacked, and processed without additional software.